Thursday, April 26, 2018

Anything Birthday Goes at Seize the Birthday!


It's a Seize the Birthday Thursday! And it's one of those weeks when truly "anything goes": no optional toppings on this cake, just make a birthday card and link it up with us. 
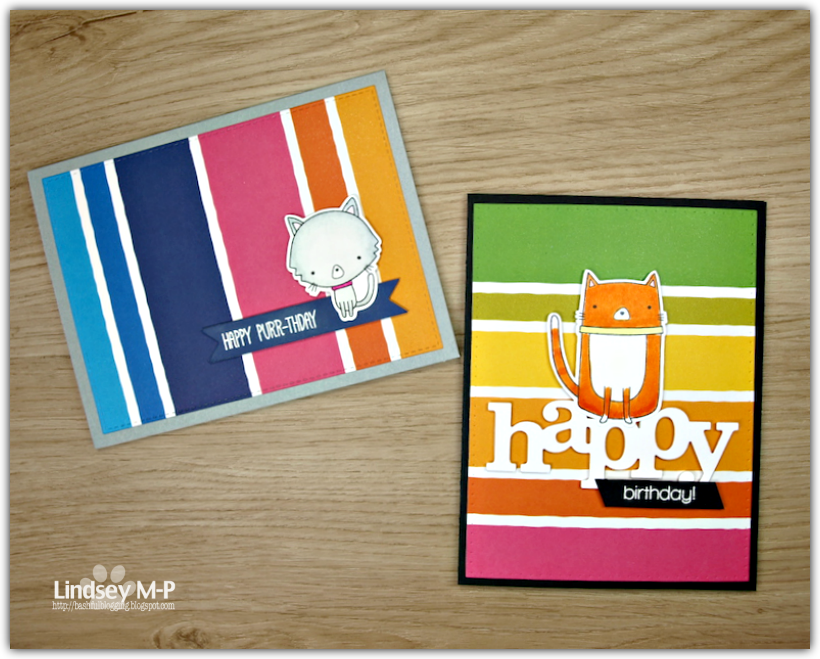
With no limits, at first I was going to go with a music theme; then floral... and when I finally had the time to make the card, cats came out again. 


This panel was coloured last fall for one of Kathy Racoosin's 30 Day Colouring Challenges. It was the only one I didn't make into a card or tag at the same time; and as it's taken me until now to use it, you may understand why I chose to not just colour, but make finished projects as well. But here it is now! I stamped and embossed the sentiment with sparkly embossing powder, then cut the panel to size so I could mat it and add a coloured card base. (I can't believe I don't own this group cat stamp yet; must correct that soon!) 
Hey look, It's Anything Goes time at Simon Says Stamp, so I'm linking my card there. 
The rest of the Seize the Birthday design team, along with our current surprise party guest Kim, have a complete range of birthday cards to inspire you!  


Supplies: black & gold cardstock, Juie's bristol paper, Mama Elephant The Cat's Meow & A Muse Studio Birthday Greetings stamps, Versafine onyx black ink, Hero Arts sparkle clear embossing powder, Zig watercolour markers

Pin It Now!

Saturday, April 21, 2018

X is for XYLOID


Just in case you didn't major in botany, Edna is doing her best to give you a big hint as to the latest theme at the Sisterhood of Snarky Stampers — X is for Xyloid! (Merriam-Webster: xyloid - resembling wood : having the qualities or nature of wood : woody, ligneous.) Lots of possibilities here — wood veneers, patterned paper, tree stamps... you get the idea. I have lots of woodgrain patterned paper, but decided to see if I could make my own, and ended up really pleased with the result!  


My woodgrain panel reminds me of the original panelling in the den of my childhood home, which was built around 1950, so I thought the vintage theme worked quite well with it. It started as a panel of white cardstock that I sponged with two shades of distress ink. Then I put the darker brown right on my woodgrain impression plate before running it through my Cuttlebug. From there it was an easy matter to colour up a crazy bird, back him with a little vellum so he'd stand out more, and put the card together with the sentiment. I like how the only white on the card is his eyes. 
Lots of xyloid interpretations on the Snarky blog today, including from our latest Queen of Snark and guest designer Karola! Grab something wood-related (I'm totally avoiding any snark as I write this sentence) and come join us! 

Supplies: white & Stampin' Up naturals ivory cardstock, Canson watercolour paper, vellum, Stampers Anonymous/Tim Holtz Bird Crazy & Crazy Things stamps & dies, Hero Arts Irreverent Birthday Messages stamp, Versafine onyx black, MFT black licorice & antique linen & vintage photo distress inks, Ranger clear embossing powder, Zig watercolour markers, Papertrey Ink woodgrain impression plate, foam tape

Pin It Now!

Wednesday, April 18, 2018

Muse: ChristmasVisions Blueprints


It is my turn to be your muse at Muse: ChristmasVisions! Even though there's freshly fallen snow outside (UGH), it is April, so I tried not to go too in-your-face Christmas-y with my design... 


For my background, I white-embossed a snowflake background on some mixed media paper then smooshed it with a mix of (of course) blueprint sketch and tumbled glass distress inks. It left a pale mottled background that was so much bluer than the snowy sky on the weekend when I made it. ;) 


Then I white embossed the little soldier on patterned paper that was as close as I could find to a blueprint sort of colour. My original intention was to stamp the soldier a second time, colour him and layer him over the first one, but I decided I liked the look of him as is. A little more authentic, perhaps? (In a totally inauthentic way, of course.) Matted on a darker blue patterned paper, then the mat and the card base, with all the corners rounded. 
You can make a Christmas card at this time of year without surrounding yourself with reds and greens and feeling a sudden urge to put on a Christmas carol playlist, so why not join us? 

Supplies: white cardstock, Strathmore mixed media paper, Heidi Swap No Limits patterned paper, Stampers Anonymous/Tim Holtz Christmas Mini Blueprints Pinkfresh Christmas Wishes & Local King Rubber Stamp Snowflakes stamps, Versamark & blueprint sketch & tumbled glass distress ink, Wow white super fine embossing powder, Marvy/Uchida corner-rounding punch

Pin It Now!

Sunday, April 15, 2018

Don't Forget, It's the Last Naughty or Nice!


Midway through April already! And that means more than halfway through the very last challenge at Naughty or Nice. ðŸ˜¢ It's true, all good things must come to an end. For this final challenge, we are asking you to look through the previous 49 challenges, pick one of the themes, and make a project to share with us! For my mid-month reminder card, I went all the way back to Challenge 17: Seeing Stars. Can you believe none of the design team ventured into space for their cards? I decided I needed to fix that:


Yes, I decided to go nice, not naughty — but I wanted a card that told everyone who played along with us in the past four years (!) that they rock! And is it perhaps a bit naughty that anytime I use this Hero Arts set, I wish this sentiment was "You Rock(et)!"? (Maybe even, "You Rocket It!"...)
While I love seeing and making galaxy backgrounds, I'm also kinda liking this straight black cardstock sky. I used embossing paste with glitter to add the starry backdrop. 


I hope you will consider joining us for this 50th and final challenge at Naughty or Nice Challenges. We have a guest designer, Toni, and PRIZES!!! 

Supplies: white & black cardstock, Stampin' Up silver glimmer cardstock, Ranger silver foil cardstock, Hero Arts Rocket Thanks stamps, Versafine onyx black ink, Ranger clear embossing powder, Memory Box Celestial Bodies & Winnie & Walter Katharine cutaway dies, Winnie & Walter Big Bang Sci-Fi Star stencil, Dreamweaver glossy white embossing paste, Stampin' Up dazzling diamonds glitter, Copic & Spectrum Noir markers, Glossy Accents, Spica silver glitter marker, foam tape, fun foam

Pin It Now!

Saturday, April 14, 2018

SNOW

I don't like winter much... but I particularly don't like winter in the middle of April. But most of Ontario is being hit with what I sincerely hope is the last blast of winter this weekend. So while I resisted putting on a playlist of Christmas music, I did decide to play along with the current Muse: ChristmasVisions challenge. My teammate, Cornelia, offers this fun inspiration:  


Inspired by the moose, trees, colours, and clean design, I managed to end up here:


I am the first to admit that while I may have been inspired by the snow to break out the Christmas stamps, it did not inspire design genius. I briefly thought of masking the moose and creating a whole little scene, but quickly dismissed that as too much work when I was already grumpy from the weather. So my moose gets a stitched square, and my trees are looked after with patterned paper. Also, I decided I wanted to colour my moose with Copics without thinking ahead that I have a grand total of one brown marker. So that's the antlers, and a sorta light brown Sharpie takes care of the fur. 😂 Cornelia's tree bling inspired the sentiment embellishments. 
Whether you're stuck in winter mode, or already enjoying spring temperatures or warmer (jealous!!!), why not take time tomorrow and play along with us at MCV? It's already April, you really should get those Christmas cards on the go! 


Supplies: white cardstock, Studio Calico Magical patterned paper, Stampin' Up Visions of Santa stamps, Versafine onyx black ink, Ranger clear embossing powder, Copic & Sharpie markers, MFT square stitched & blueprints 24 dies, Nuvo white blizzard glitter drops, Glossy Accents, Hero Arts blush dots, foam tape

Pin It Now!

Thursday, April 12, 2018

Vibrant Colours at Seize the Birthday


Thursday means it's time for a new challenge at Seize the Birthday


Our optional "topping" this time around is VIBRANT COLOURS. This is not a huge challenge for me; as I looked through my cards for Seize the Birthday so far, most of them are nice and bright. But if you're not as fond of bold colours, our toppings are always optional — as long as it's a birthday card, come and link up with us! 
Another thing I noticed as I looked through my first few months with Seize the Birthday... I haven't done any cat birthday cards! I thought I should rectify that oversight: 


I did think I'd make my own background, and went to work with stencil, embossing paste and some watercolour powders. I was less than thrilled with the result. Second option — patterned paper! It's hard to beat this particular design for vibrant colours. For that reason, I kept my kitty colouring to gentle greys as contrast, apart from the bright pink collar. The flip side of the paper is navy, so I used a scrap of that for the sentiment banner. 
That card was so easy, I decided to make another! 


I went portrait layout for this one. This part of the paper isn't quite as bold as the first section I used, so I decided I could go with a vibrant cat this time. A big happy and a white embossed birthday on black completed the card. 
With the colours and the die cut sentiment, I'm adding this to the current Just Us Girls word week challenge: BOLD.  


I hope you'll join us! 


Supplies: white & black cardstock, Memory Box grey card base, American Crafts Margarita Tango patterned paper, MFT Cat-titude & Cool Cat stamps & dies, Simon Says Stamp Happy stamp, Versamark & Versafine onyx black inks, Hero Arts white embossing powder, Copic & Spectrum Noir markers, Winnie & Walter In a Word: Happy & Katharine cutaways & MFT blueprints 24 rectangular frame dies, foam tape

Pin It Now!

Saturday, April 7, 2018

April Showers

Where I live, this week's showers have been of the solid white variety! With a little freezing rain thrown in, just for fun. But eventually (being APRIL and all) there will be rain showers, and Edna wants you to be prepared. 


U is for Umbrella! Seems like a straightforward enough prompt, but I'm not the only Snarky Sister that took a bit of a left turn with this:


The card itself is not particularly snarky, but I thought turning an umbrella challenge into a drinking card was snarky enough. ;) Once the idea jumped into my brain, this was an easy card to put together, with a little die-cutting, a little scoring, stamping and embossing a sentiment and adding a couple of embellishments. 
Speaking of snarky, it's always fun to add something CAS to the Simon Says Stamp challenge, so I will link this to the current challenge A Trio of Something.
I think you'll enjoy the various interpretations of this prompt you'll see on the challenge blog today, including that of our current Queen of Snark, Michelle! I hope you can join us. 


Supplies: white, blue, yellow & pink cardstock, patterned paper scraps (including the green panel), Paper Smooches Free Spirits stamp, Versafine onyx black ink, Hero Arts sparkle embossing powder, Paper Smooches Free Spirits Icons dies, Nuvo ebony crystal drops, foam tape

Pin It Now!

Monday, April 2, 2018

Still Easter?

I'm sneaking in at the end of the evening on Easter Monday so I can share the cards I made this year. Usually I let the weekend go by and then don't want to extend the season... bad enough that you keep seeing Christmas cards from me. ;) 


I wanted the bunny to shine on this first card, but also felt like being a teeny bit artsy, so white-embossed a plaid background stamp then watercoloured it in Easter colours. It's possible the bunny really loves the carrot more than the recipient of the card, but I still thought the sentiment went well with the image. A few sequins added a little bling.


Another bunny, and when I looked at his arms, I thought he would make an excellent Easter egg juggler. I used some glitter glue for the egg white leaking out of the broken one. 


And just to keep things from getting too boring, an Easter chick for the third card I made this year. The watercoloured panel is another leftover from my experiments with tissue paper a few weeks ago. I added a little embossing and scoring to the card base, but otherwise kept it clean and simple. Because of that, I'm entering this in the almost-over CAS on Friday Easter challenge. 
Whether you were observing Easter or not, hope your weekend was a good one! 


Supplies: (some bunny) white & purple cardstock, Strathmore watercolour paper, Paper Smooches Spring Fling stamp and die, Lawn Fawn My Silly Valentine & Hero Arts Plaid background stamps, Versamark, Versafine onyx black, squeezed lemonade & wilted violets distress inks, Ranger clear & Hero Arts white embossing powders, Copic markers, Spellbinders circle die, Little Things from Lucy's Cards heather sequins, frosted lace Stickles, foam tape; (hoppy Easter) white & Papertrey Ink soft stone cardstock, Strathmore watercolour paper, Paper Smooches A Magical Spring stamps & die, Sunny Studio A Good Egg & (?) border stamps, Versafine onyx black & Memento dandelion ink, Ranger clear embossing powder, Zig markers, MFT blueprints 24 & Spellbinders circle dies, Studio G glitter glue, Nuvo ebony crystal drops, foam tape; (happy Easter) white cardstock, Strathmore watercolour paper, tissue paper, Sunny Studios A Good Egg stamp & die, Simon Says Stamp Big Greetings & Happy stamps, Versafine onyx black & squeezed lemonade, carved pumpkin & candy apple distress inks, Ranger clear embossing powder, Zig markers, Cuttlebug Seeing Spots embossing folder, Spellbinders wonky reverse rectangle die, fun foam, foam tape 

Pin It Now!

Sunday, April 1, 2018

One Last Naughty or Nice


Sadly, it's not an April Fool's joke... the Naughty or Nice Challenge blog is coming to an end. But when better to announce it than April 1st! With this, our 50th challenge, we are going to look back on the previous 49 themes and ask you to choose one for your final entry! (well, please not the Anything Goes ones...)  


For today's card, I went all the way back to May, 2015, and the Friends challenge, although there is a side helping of our last challenge, Drink Up, in there too... 


I've had this card pinned for ages, and finally tried the technique. I like the way it keeps the ink bright on the kraft cardstock, and the slightly wonky effect of offsetting the colours against the white. For the bottle and small glass, I used a few watercolour pencils to add some colour. 


I am going to add this to the current Anything Goes challenge at Simon Says Stamp.
I hope you'll come and join us for the grand finale of Naughty or Nice Challenges! P.S. We have guest designer Toni, and prizes, too! 


Supplies: Stampin' Up kraft, basic black & old olive cardstock, PTI Uncorked & So Suzy stamps, Versafine onyx black, Colorbox frost white, Memento tangerine, pear tart, teal zeal & ladybug inks, Ranger clear embossing powder, watercolour pencils, Lil' Inkers stitched rectangle die

Pin It Now!