Saturday, October 31, 2020

The FauX Sisters


Happy Halloween! A different Halloween for many, to be sure, but any excuse to eat extra treats and play a few tricks, right? ;)  The Sisterhood of Snarky Stampers have a treat AND a trick for you, and that would be our new challenge, F is for FauX. Lots of faux techniques out there to discover, or perhaps you have a favourite. My pick is faux metal:


I die cut the large Merry Christmas sentiment three times from white cardstock and adhered them together for a solid base before I started some heavy-duty heat embossing! Four coats of silver embossing gave me the metal-like finish I was hoping for. For the small snowflakes, I used two layers of cardstock and three layers of embossing. I also added a border of silver embossing to my red cardstock layer and the sentiment panel. 


My sisters in snark, and our reigning Queen of Snark Beverly, have all kinds of ways to show off how faux they are! Hope you will find time to join us. 


Supplies: Neenah white & Recollections red cardstock, Viva Las VegaStamps I'm Dreaming of a White Christmas stamp, Versamark & Memento ladybug ink, Ranger silver embossing powder, CUTplorations Merry Christmas Word Art & Sunny Studio Stamps snowflake dies

Pin It Now!

Inkspirational: Night


Happy Halloween! It's time for a new Inkspirational challenge, and appropriately for the date, we have the word prompt NIGHT. I almost went in a different direction, but then no, I made a Halloween card. :D

 
To begin my spooky little scene, I masked off a section of my grey card base and blended a cloudy night sky in blues and purples. I stamped and embossed my three little ghosts and die cut them, adhering the bottoms of the ghosts directly to the card base, and popping them up with foam tape at the top for some ghostly dimension. The sentiment is white-embossed on a strip of black cardstock. 


My teammates have a wide variety of NIGHT interpretations for you to admire and perhaps be inspired by! I hope you'll come and play along! 


Supplies: Neenah white, Stampin' Up grey & basic black cardstock, Essentials by Ellen Got Candy? stamp and die, STAMPlorations Boo! stamp, Versamark, Versafine onyx black & faded jeans, chipped sapphire & wilted violet distress ink, Wow clear gloss & white embossing powder, MFT mini cloud edges stencil, foam tape

Pin It Now!

Thursday, October 22, 2020

Seize the Birthday: Texture


It's time for a new Seize the Birthday challenge! We are looking for some kind of texture on your birthday card or project. Of course, we always offer the "anything goes" option too, so if texture isn't motivating you, all birthday creations are welcome. 
My texture today comes in the form of some glittery embossing paste: 


I think someone's birthday fishes are coming true for one guy on this card - and the rest are his birthday dinner! :D To start, I blended distress ink all over a white cardstock panel. I didn't worry about getting the colour too even, as I thought it gave a little more "depth" to the ocean. Using a wave stencil, I added a mix of embossing paste, the same colour ink, and fine blue glitter. While that dried, I stamped, watercolored and die cut the fish. I also stamped and fussy cut the sentiment. When I was arranging the elements on the now-dry base, I realized it needed something to ground the scene, so blended distress inks on a torn piece of cardstock for a sandy bottom. 
I'm adding my card to two challenges: CAS Mix Up is looking for tone on tone stencilling, and STAMPlorations has an anything goes stencil challenge. If I wasn't on the design team, this would have been perfect for the current Color Hues challenge! 


There are some really beautiful textured cards to see on the Seize the Birthday blog, from the rest of the design team as well as our current surprise party guest, Angie - check them out and then I hope you will join us! 


Supplies: Neenah white cardstock, MFT Beach Buds stamps & dies, Paper Smooches Birthday Buddies stamps, Versafine onyx black & mermaid lagoon, carved pumpkin, antique linen & vintage photo distress inks, Wow clear gloss embossing powder,  Studio Katia Brushstroke Waves stencil, Dreamweavers translucent embossing paste, Ranger Stickles mermaid dry glitter, MFT wonky stitched rectangle die

Pin It Now!

Wednesday, October 21, 2020

Tis the Pink Christmas Season

With hours to spare, I've got a PINK Christmas card for Jingle Belles' Pink Christmas challenge, which annually raises money (out of challenge co-hostesses Lauren's and Stef's wallets) for breast cancer research. I think I missed out last year, sadly, but had an extra incentive this year since my friend Jo is also looking for pink cards for her current Christmas Kickstart Challenge
My card is clean & simple... & pink:


I love these beautiful big snowflakes from Studio Katia - they're pretty enough that the science part of my brain can forgive the fact that they have more than six sides. :D To give my card a little extra interest, I decided to go slimline, embossing five flakes on my panel before blending some pink pearlescent ink around each one. The sentiment is stamped in the same ink. A few pink gems added just enough extra to call the card finished. 


Pink is not exactly a favourite of mine, but I'm sure I can find someone to send this to! :D 


Supplies: Neenah white cardstock, Studio Katia Snowflakes & Hero Arts Colour Layering Wreath stamps, Versamark & Brilliance pearlescent orchid ink, Hero Arts white embossing powder, Pinkfresh essentials slim cut die, Studio Katia pink tourmaline (October) crystals

Pin It Now!

Saturday, October 17, 2020

It's Time for Halloween in Pink!


Welcome to our annual Pink Halloween challenge at the Sisterhood of Snarky Stampers! Just to mix it up a bit, we're calling it H is for Halloween (in Pink). ;) We like to shine a little attention each year on October being Breast Cancer Awareness Month. Pink may not seem the first choice for a Halloween colour, but you might be surprised at how easy it is to incorporate! Here's my version: 


Not particularly snarky, but it may well be the first ever kinesiology-themed pink Halloween card! I have used four pieces from a Tim Holtz Halloween ephemera pack - the druggist oval and palmistry hand were already pretty in pink, and I added some pink ink to the other two panels. I also tinted the patterned paper base pink. I stamped and popped up the sentiment. 


You will find great pink Halloween inspiration from my sistahs and our current Queen of Snark and guest designer, Beverly, on the Snarky Stampers blog! Grab something spooky in pink and join us!

Supplies: Neenah white & Recollections black cardstock, Pebbles Thirty One patterned paper, STAMPlorations Boo! stamp, Simon Says Stamp intense black, spun sugar & worn lipstick distress ink, Tim Holtz/Idea-ology Halloween ephemera, foam tape

Pin It Now!

Inkspirational: Photo


Happy Saturday! Time for a new Inkspirational challenge, and we have a photo challenge to inspire you. This is perfect for autumn or Halloween, depending on where the elements of the picture take you - or it may take you in some other direction! I drew on a few different aspects for this Halloween card: 


I really liked that the inspiration pic suggested daytime, but didn't seem to have the stamps to make that work. Instead, I tried to hint at it with my stencilled sky, including some light tones in the blue shading. I also wanted to capture the curved horizon, stippling some browns and orange for the ground (with the gravestones masked off) and then softening the border between land and sky with some generational stamping. The witch. tree and sentiment are stamped and then embossed with matte embossing powder - it seems to make an appearance every Halloween. ;) I even snuck in the fence from the photo, stamping it behind the tombstones. 


As so often happens with a photo challenge, there is a wide variety of inspiration for you at the Inkspirational blog! I hope you will join us. 

Supplies: Recollections black & Koh-In-Oor smooth bristol cardstock, Catherine Pooler Spooky Hollow, Stampin' Up Tee-tee-Hee & Gina K. Designs Tropical Flowers stamps, Versafine onyx black, broken china, blueprint sketch, faded jeans, chipped sapphire, carved pumpkin, antique linen & vintage photo distress inks, Wow clear matte dull embossing powder, grey Copic marker

Pin It Now!

Friday, October 16, 2020

Color Hues: Blue and Orange


We're halfway through the month, and so it is time for a new Color Hues challenge! This time we are asking you to play with the complementary colours of blue and orange. I think there are lots of options with this pair of colours. I decided to go a bit snarky for my card: 


An orange tabby hipster wearing a blue blazer? Works for me. :D He is stamped on some die cut watercolour paper and coloured with Gansai Tambi paints. Rather than leave the glasses plain, I die cut him a new pair from blue foil cardstock. After adding the sentiment, I layered him with a couple of patterned paper panels and finished with a white card base. 


Where will the colours blue and orange take you? I hope you will visit the Color Hues blog to see all the beautiful cards my teammates have created, and feel inspired to join us! 

Supplies: Bazzill marshmallow & $ store blue foil cardstock, Master's Touch watercolour paper, Authentique Anchored patterned paper, Stampers Ananymous/Tim Holtz Hipster stamps & die, Hero Arts Irreverent Birthday stamps, Simon Says Stamp intense black ink, Gansai Tambi watercolour paints, Sizzix/Tim Holtz stacked deckle dies

Pin It Now!

Thursday, October 8, 2020

Seize the Birthday: Use Your Scraps

Happy Thursday! It's time for a new Seize the Birthday challenge - do check back to my previous post to see if you were a winner of my mystery prize! Meanwhile, we are back with our newest challenge, Use Your Scraps. This was my challenge choice, and I ended up with three cards! My first:  


For this card, I sorted through my cardstock scraps and came up with three scraps of coordinating blue cardstock. After cutting them into strips, I layered them diagonally with white. I had some precut blue daisies, but none of them looked quite right, so I turned to leftover blended panel scraps instead, and found this one that worked perfectly. A simple sentiment and some gems completed the card. 


This card went so well, I decided to make another in green! 


This time I was able to collect four cardstock greens that worked well together. The leaf collage is made from images already stamped and die cut - just waiting to be used! This time I used a grey card base - and the greens really bring out the green undertones of the cardstock. 


But wait! I hadn't used any patterned paper scraps yet! A third card was needed: 


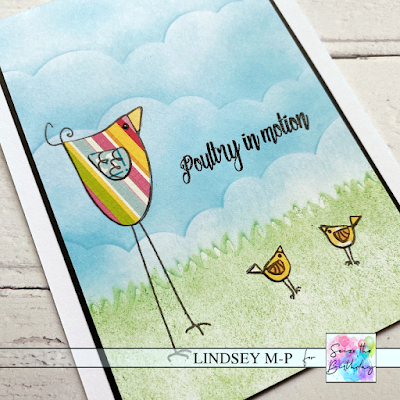
These stamps were created by Seize the Birthday's very own Shirley! I've had them for a while now, and it was more than time they saw ink. The large body of the big bird seemed perfect for paper piecing! The little ones were a bit trickier. ;) One great thing about paper piecing - I didn't have to mask anything before I made the background panel. This isn't overtly birthday themed, but a birthday sentiment inside makes it one. ;)  I am going to add this card to Darnell's October NBUS challenge for my bird use. :D 


If you make cards, it's possible you may have a scrap or two you have yet to use. :D Be sure to check the inventive ways the StB design team, and our current surprise party guest Angie, have used their scraps! Hope you will join us. 


Supplies: (blue birthday) Neenah white & blue cardstock scraps, Clearly Besotted Many Mini Messages stamp, Catherine Pooler juniper mist & salty ocean distress ink, Wow clear gloss embossing powder, Simon Says Stamp Fresh Daisies & MFT diagonal stitched rectangle dies, Studio Katia September gems; (green birthday) Neenah white, Papertrey Ink soft stone & green cardstock scraps, Clearly Besotted Many Mini Messages & (?) stamps, many different inks, Wow clear gloss embossing powder, MFT blueprints 24 stitched rectangle die; (poultry) Neenah white & Stampin' Up basic black cardstock,  Echo Park patterned paper, STAMPlorations Fowl Play stamps, Versafine onyx black & tumbled glass & mowed grass distress ink, Wow clear gloss embossed powder, MFT cloud die, MFT grass die

Pin It Now!

Seize the Birthday 200th Challenge: Surprise Winner!


THANK YOU to everyone who participated in the Seize the Birthday 200th Challenge celebrations! Such a terrific selection of birthday cards in our gallery - it was fun to see how you were inspired! The Seize the Birthday blog has our overall winners, but I was one of the design team's mystery prize stops, offering this trio of Simon Says Stamp sets: 


To be eligible, we asked that you visit and comment on each of the design team's blogs, and of course make a birthday card for the gallery! I had 33 terrific comments on my blog, and from that number, I asked Random to make a selection...


My very first commenter, who also hopped and made a card, is... Joyce!  Congratulations, Joyce! Please contact me in order to receive your prize. 
Thank you again to everyone who joined our birthday party bash! I'll be back in an hour with my inspiration for Seize the Birthday's 201st challenge. 


Pin It Now!

Wednesday, October 7, 2020

ABC Christmas Challenge: U & V


Here we are, a week into October! The first Wednesday of the month means a new challenge at ABC Christmas Challenge. You can tell we're winding up the year as we are up to the letters U and V
My cards today combine both of our letter prompts! U is for Up in the Air, and V is for Vixen (or other reindeer). Here's my first card: 


This reindeer is actually Dasher, not Vixen, but I am not one to be stopped by the name a company gave its stamp! :D It's a favourite, and I usually use it at least once each year. For the main panel, I tore a piece of scrap paper to use as a mask before blending my sky in blues with hints of purples and pink for a bit of a northern lights look. My up in the sky element is my stencilled stars - this was my first time using Picket Fence Paper Glaze, and I love how easily it spreads, and the satiny, opaque finish. Dasher/Vixen is embossed in sterling shimmer embossing powder and is very glittery. I decided not to disrupt the serenity of the scene with a sentiment. 


My second card has more emphasis on the Up in the Air prompt and less on the Vixen side: 


I die cut a large circle out of some scrap paper, then added a die cut skyline across the bottom before blending another night sky. This time I made it darker, more like you would see in a populated area rather than where Santa's reindeer live. ;) Santa's sleigh and the sentiment are both embossed with black sparkle embossing powder, which just happens to make a perfect match with the black glitter cardstock down the left edge! 


I'm sure you will enjoy seeing all the different ways the ABC team has interpreted this month's themes! December is inching closer - why not be inspired and add a few Christmas cards to your stash?

Supplies: (dasher) Neenah white cardstock, Stampin' Up Dasher stamp, Versamark & spun sugar, shaded lilac, dusty concord, blueprint sketch, faded jeans & chipped sapphire distress ink, Brutus Monroe sterling shimmer embossing powder, Heidi Swapp confetti stencil, Picket Fence snowdrop white paper glaze, Creative Memories corner-rounding punch; (merriest wishes) Neenah white & Concord & 9th graphite glitter cardstock, Sunny Studio Stamps Here Comes Santa & Hello Bluebird Snow Play stamps, Versafine onyx black & dusty concord, blueprint sketch, faded jeans & chipped sapphire distress ink, Ranger black sparkle embossing powder, icicle Stickles

Pin It Now!

Saturday, October 3, 2020

Sisterhood of Chalky Stampers


Welcome to a new challenge at the Sisterhood of Snarky Stampers! Edna and the sistahs are challenging you with C is for CHALKBOARD. It has been a loooong time since I've done the chalkboard technique! Once I reminded myself how, here's what I came up with:  


Not that this card is a suggestion; merely an observation. :D The sentiment is inked and embossed in white, and then I die cut the panel with a wonky stitched die. I used the same white ink to add the bat and ghost along with some chalky smears. I used a white pencil crayon to add a few extra lines. A little patterned paper and a black card base finished the card. 


Of course, once I'd remembered how to do the chalkboard technique, I decided to make more! 


I have most of a pad of 12" by 12" "chalkboard cardstock - and not a sheet of black in it! And yes, I have been in classrooms with green chalkboards, so this seemed a good choice. Once again, the main parts are embossed, then the little stars are not. I added pencil borders and shadings.  


One more!


This time I even found a sheet of "chalkboard" patterned paper! 


Of course there is a lot of chalky inspiration on the Snarky blog, from my sisters in snark and our newest Queen of Snark and guest designer, Michelle! Check it out and then join us! 

Supplies: (Halloween) Recollections black cardstock, Echo Park The Apothecary Emporium patterned paper, Crackerbox & Suzy Safest Day & MFT Frightfully Fun Halloween stamps, Brilliance frost white ink, Wow white embossing powder, white Prismacolor pencil MFT wonky stitched rectangle die; (merry & bright) DCWV All Chalked Up green cardstock, Pink Paisley Snow Village patterned paper, Neat & Tangled May Your Holidays Be & MFT Frightfully Fun Halloween stamps, Brilliance frost white ink, Wow white embossing powder, white Prismacolor pencil; (Santa) DCWV All Chalked Up red cardstock, Studio Calico Magical patterned paper, Unity Santas, Stockings, Candy Canes etc. stamp, Brilliance frost white ink, Wow white embossing powder, white Prismacolor pencil, Studio Katia iridescent ice flakes 

Pin It Now!

Inkspirational: Angle It


Happy October Saturday! Inkspirational is back with a fun new challenge: Angle It. Here's my take on it: 


I've been meaning to use these Alice in Wonderland stamps for a while now. When my niece (who happens to be an Alice) told me how very strange high school was this year, I had my opportunity. :D To start, I used a curved mask to ink my purple spiral on grey cardstock. Then I coloured my Alice and fussy cut her. For the card base, I used the same purple ink to blend a wonky scalloped border, then stamped and embossed a few other Alice stamps down the panel. Both my Alice panel and my sentiment are angled to go with the challenge theme. Alice is rather on an angle, too! 


Since I've inked up my Alice stamps for the first time, I'm adding this card to Darnell's October NBUS gallery. 
Lots of fun, angled creations on the Inkspirational blog, so I hope you will check them out and then join us! 


Supplies: Neenah white, Stampin' Up basic black & PTI soft stone cardstock, Miss Ink Alice & Tea Party stamps, Versafine onyx black & dusty concord distress inks, Wow clear gloss embossing powder, Copic markers, MFT wonky stitched rectangle & Paper Smooches borders 1 die, foam tape 

Pin It Now!