Pages

Thursday, January 31, 2019

Happy Little Stampers: Watercolour and Metallics

Welcome to a new Happy Little Stampers Watercolour Challenge for the month of February!


This month our optional twist is "metallics". Shocking, I know, but to me that meant getting out my metallic embossing powders and deciding which one I wanted to use! ;) Once I'd decided on gold, I gathered the rest of my supplies and made this: 


To go with the gold outline, I used my Twinkling H2Os so my flowers would have a little shimmer, too. After they were dry, I mixed a little distress ink with water and iridescent medium so the background would shimmer, too. The perfectly sized sentiment would have been ideal between the two flower sprays... but that perfect sentiment doesn't exist in my stamps, so I went for more metallics, embossing the sentiment on vellum and overlaying the main panel. As I decided on a card base, I discovered a matching cardstock for the flowers, and this simple card was done. I am linking it to the current "anything goes" challenge at Simon Says Stamp


My watercolouring teammates have made beautiful use of metallics on their inspiration cards, so please visit the HLS blog to see everyone's creations! It may be a short month, but you have all of it ahead of you to join us! 


Supplies: Stamping' Up rich razzleberry cardstock, Canson watercolour paper, vellum, The Ink Road Bella Flora & Compliments, Volume 1 stamps, Versamark & tumbled glass distress ink, Simon Says Stamp antique gold embossing powder, Twinkling H2Os, Winsor & Newton iridescent medium, Winnie & Walter Katharine cutaway die

Seize the Black & White Birthday


Happy Thursday! I know my teammate Glenda is currently enjoying mild temperatures and the beginning of spring blooms, but here we are ending a COLD and SNOWY January! So I don't mind at all staying inside and making cards. :) Today starts a new challenge at Seize the Birthday, and we offer a fun optional "topping" for you... 


BLACK and WHITE! Black and white together is such a classy look, but I rarely think to use it. I made two:


I decided I wanted a clean and graphic design to complement the black and white colour scheme. For my first card, I went with a white sentiment panel on a dry-embossed black background: 


Although essentially impossible to see in the photo (especially my photos, sigh), the black is embossed with Swiss dots after cutting the sentiment panel out of the centre. I then cut the same sentiment panel in white, embossed my sentiment, and fitted the two together. I added a trio of flowers to add a bit more interest to the finished card. 


It seemed to only make sense to use the leftovers for a second card in the reverse order! This time I embossed the white panel in a herringbone pattern (and left off the flowers, for a perhaps more masculine look...). While I initially thought I'd use a black card base for this, it turned out to look better with a black mat and white card base. To me, at least. :D 
It's fun to see what a wide variety of cards can be produced from a simple black and white colour scheme! Our surprise party guest, Julie, and all the design team have beautiful takes on our theme. Whether you go for black and white or decide you need a rainbow of colours, make a birthday card and join us! 

Supplies: Neenah white & Stampin' Up basic black cardstock, A Muse Birthday Greetings & Studio G stamps, Versamark & Versafine onyx black ink, Wow clear & white embossing powders, Spellbinders labels 4 & MFT Blueprints 29 stitched rectangular dies, Cuttlebug Swiss dots & Sizzix/Tim Holtz pinwheel embossing folders, Petaloo jewelled florettes

Saturday, January 26, 2019

Valentines at the Sisterhood

Happy Saturday! As January nears its end, the Sisterhood of Snarky Stampers naturally starts to think about the month ahead, and that romantic special occasion... 


Edna is offering the straightforward theme, V is for VALENTINE. Funny thing about the Sisterhood... if I don't make a snarky card, I often make a card outside my regular clean and simple "style", which if nothing else has the potential to make me feel snarky. For this challenge, I went for more of a shabby, vintage, collage style than usual. Here it is:


It all started when I thought it would be fun to use a Tim Holtz paper doll on a valentine, not even remembering there was this bride and groom! I like adding a pop of colour to them, so coloured her bouquet with a faded lipstick distress marker. Then I found this sepia-toned paper in one of my Valentine-themed paper pads. I would have been happy to stop with the happy couple, the blue heart and the Valentine ticket, but thought there might be repercussions to leaving a Tim Holtz product so CAS. :P So I added some stamped hearts and music in opposite corners, and dug into my sack o' heart die cuts for the three pink/rose ones. I just couldn't bring myself to distress the edges of the paper with either ink or tearing, though. 
No surprise, most of the sisters have managed much more snark on their valentines - be sure to check out all the creations, including that of our newest Queen of Snark, Kylie! You need a valentine or two for the 💘 day ahead, right? Come and share your project with us! 

Supplies: Neenah white cardstock, Basic Grey True Love & other assorted patterned papers, Local King Rubber Stamp music background & Unity All for Love stamps, Memento rich cocoa ink, Fancy Pants Mulberry Road heart & Be Loved ticket, Tim Holtz Idea-ology Ancestors paper doll, assorted die cut hearts, foam tape

Thursday, January 17, 2019

Seize the Birthday - Stamping Only!


It's time for a new challenge at Seize the Birthday, and we have an interesting optional "topping" for you this time around! 


Our theme for the next two weeks is "stamping only". I call it interesting because none of of were sure precisely what we meant by that! I decided to take it as a challenge to create my own background paper. It also encouraged me to finally give my MFT plaid builder stamps an outing. For the first one, I picked warm and sunny colours for my plaid: 


I used two of the same colours as in the plaid for inking these two plaid-reminiscent butterflies before stamping and embossing the black sentiment. I wasn't sure if embellishments were *allowed* under the stamping only theme, so I left my card unadorned. 


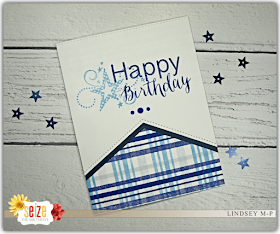
My first experiment in plaid-making was successful enough that I made another one, this time in blues: 


This time, since it was my second card, I chose to add a trio of Studio Katia crystals underneath the sentiment. 


Even though I did take the time to make my own plaids, I think these designs are clean and simple enough to enter in Simon Says Stamp's Wednesday clean and simple challenge. 
Be sure to check out the stamped creations of my team members as well as our current surprise party guest, Julie! We'd love to have you join the party with a birthday creation of your own.


Supplies: (butterflies) Neenah white cardstock, MFT Plaid Background Builder, Unity Bevy of Butterflies & Clearly Besotted Fancy Sayings stamps, Versafine onyx black & Catherine Pooler tiara, orange twist & mandarin spice inks, Wow clear embossing powder, Winnie & Walter Katharine cutaway & Spellbinders reverse wonky rectangles dies, foam tape; (star) Neenah white cardstock, MFT Plaid Background Builder, Unity star & Simon Says Stamp Essential Greetings stamps, Versamark & Altenew Arctic, Caribbean sky & sapphire inks, Wow clear embossing powder, Sunny Studio Stamps fishtail banners dies, Studio Katia sapphire (September) crystals

Saturday, January 12, 2019

B Should Always Be for Books


Happy Saturday! Here in my neck of the woods, we've been in a bit of a cold snap the last few days — what better time to curl up with a good book or three? And so here at the Sisterhood of Snarky Stampers, we offer our latest challenge, B is for Books! A number of the sisters are bookworms, and we've been looking forward to this challenge. I pulled out all my book-related stamps, and while the collection doesn't quite compare to my stockpile of cat stamps, it's, um, sizeable. So I looked them over and managed to come up with something with at least a little bit of snark. 


Not a very apologetic apology! These stamps are from a long-ago Simon Says Stamp kit... I pretty much never buy kits, but this one was books, so of course I did. I've even used it a few times! This was fun to make, especially the red book waiting precariously on the shelf. I _could_ have done some masking for the book pile at the bottom, but life seemed too short. 
Then, while I had my book-related supplies out...


Tim Holtz blueprint stamp, sentiment from the same set as above. Kept the design clean in white, grey, red and black. 


Another book stamp set! This one from My Favorite Things, paired with a sentiment from STAMPlorations. This time I did some masking, to add the mug and the napping cat to the scene.


This time the books are from a WPlus9 set (this one has books AND cats!) and another sentiment from STAMPlorations. A little masking again, to add the Stampin' Up mug to the book pile.
Also, easiest photo staging ever! I simply pulled a couple of my favourite author's books from my collection. People can collect more than one type of thing, you know! :P 
We have book-related cards both with snark and without for your enjoyment on the blog today, from my sisters and our latest Queen of Snark, Cornelia! Be sure to stop by to admire their talent and be inspired! 

Supplies: (so sorry) Neenah white & Stampin' Up black cardstock, Authentique Be(you)tiful patterned paper Simon Says Stamp To Thine Own Shelf stamps, Versafine onyx black, Memento morocco, bamboo leaves, cantaloupe, rhubarb stalk, rich cocoa, London fog, cottage ivy, teal zeal, Paris dusk, ladybug & pear tart inks, Wow clear embossing powder; (big books) Neenah white, PTI soft stone & Recollections black cardstock, Stampers Anonymous/Tim Holtz schoolhouse blueprints & Simon Says Stamp To Thine Own Shelf stamps, Versafine onyx black & Stampin' Up real red inks, MFT blueprints 29 stitched rectangle & Sunny Studio Stamps fishtail banner dies; (cup of tea) American Crafts textured blue cardstock, Canson watercolour paper, MFT Our Story & STAMPlorations Literary Caffeine-ations stamps, Versafine onyx black ink, Wow clear embossing powder, Zig markers, MFT diagonal stitched rectangle frame die; (may your cup be full) Neenah white & PTI smokey slate cardstock, Authentique Be(you)tiful patterned paper, WPlus9 Smart Kitty, Stampin' Up Every Little Bit & STAMPlorations Literary Caffeine-ations stamps, MFT extreme black & Altenew Persian blue inks, MFT stitched rounded rectangle die, foam tape

Thursday, January 3, 2019

Seize the Confetti!


It's the first challenge of 2019 at Seize the Birthday! For this January kickoff challenge, we are offering the optional *topping* of CONFETTI


As always, you don't have to seize the topping, but consider it an extra inspiration for making a birthday card. To be honest, I double-checked with the team to make sure confetti wasn't some fab new product or technique I had missed out on. But no, we're talking about the fun stuff that seems to be mostly outlawed for throwing after weddings now. :P I did once receive a confetti-bomb wedding invitation, though. 
Switching back to birthdays, here's my card, photographed on a very cloudy dull day, sadly: 


My confetti background is made with a stencil and a rainbow of distress oxide inks. My little guy popping out of a present seemed just right for the mood of the card. He doesn't come with a birthday sentiment though, so I went to another of my cat sets *koff* for an appropriate one. For another hint of confetti, I pulled out a few grey gems for the card base. 


A little confetti can make for a fun card! There are lots more fun creations on the challenge blog. We have a new teammate, Cathy Roffey, and a new surprise party guest, Julie Beech - let's give them both a warm welcome. Whether you end up with the confetti or not, why not get a start on your 2019 birthday cards and join our challenge! 

Supplies: Neenah white cardstock, Memory Box grey card base, MFT Cool Cat & I Knead You stamps & dies, Versafine onyx black & worn lipstick, festive berries, wild honey, fossilized amber, bundled sage, mermaid lagoon & wilted violet distress oxide inks, Wow clear embossing powder, Copic markers, Simon Says Stamp falling snow stencil, MFT blueprints 29 sentiment flag & Sunny Studio fishtail banner dies, Studio Katia grey cloud crystals, foam tape

Wednesday, January 2, 2019

Goodbye Muse, Hello ABC Christmas

A fun challenge came to a close at the end of 2018 when Muse: ChristmasVisions held its final challenge. I really enjoyed my year working with Ardyth and the rest of the design team, but all good things do seem to come to an end eventually. 
It's so helpful come December to have been making Christmas cards throughout the year, and being on a Christmas challenge team is a great help in accomplishing that. So I'm excited to announce I've been accepted as a new member of the ABC Christmas Challenge team! 

ABC Christmas Challenge runs through the alphabet with two or three letters per month to spark your creativity. For January we are starting, not surprisingly, with A and B. First up is A for Anything Goes:


This is the last card I made before Christmas, with this challenge in mind. It's got a fair amount going on compared to my usual cards - a stamped background with some additional green sponging around the edges, watercolored and die cut evergreen branches, a sparkly die cut jingle bell, and a stamped sentiment. All that plus a panel of patterned paper to ground the sentiment and cluster of images. Oh! There's also some red twine for the jingle bell and a few star sequins. :) 


The second challenge theme for January is B for Berries:


And this is my first Christmas card destined for 2019 mailing! I had given a quick try to these Sunny Studio layering holly stamps in November when I was making tags, with absolutely zero success. When I was able to take the time to look at the set more closely, I discovered a few of the stamps are labelled incorrectly! It wasn't just my fault. :P Using the right trio of stamps for each holly leaf produces such beautiful results. I chose to use them to frame this big sentiment, layered on a die cut green panel. Perhaps before Christmas I would have decided to bling this up a lot more, but I just added a little sparkly *frosting* to the berries. 


While you still have the lingering aftereffects of your 2018 Christmas spirit hanging around, why not be inspired by these two prompts, make a Christmas card or two or three and join us! For more inspiration, be sure to check out the beautiful cards of my new teammates. 


Supplies: (Tis the Season) Stampin' Up very vanilla, garden green & real red glitter cardstock, Teresa Collins Noël patterned paper, Hero Arts music collage background & Uniko Simply Said Blocks Christmas stamps, Stampin' Up garden green & several green distress inks, Paper Smooches Wreath Builder, Lil' Inkers Jingle Joy & Winnie & Walter Katherine cutaway dies, Hemptique red twine; (holly) Neenah white & Stampin' Up garden green cardstock, Sunny Studio Christmas Trimmings stamps & dies, Simon Says Stamp Peace on Earth sentiment stamp,Versamark,  Memento bamboo leaves, Stampin Up garden green, Simon Says Stamp green leaf & Altenew crimson & velvet inks, Wow clear embossing powder, MFT stitched scallop rectangle die, Gelly Roll clear sparkle pen